/
/
/
How to Add an Email Account to Microsoft Outlook on Windows

How to Add an Email Account to Microsoft Outlook on Windows

Adding an email account to Outlook is generally fairly quick, but may come with a few surprises during setup. When you first install and run Outlook, you'll be prompted to add an email account.

However, once you've added your first account, it's often difficult to figure out how to add more.

This article tells you how to configure your email account on Outlook from your Windows PC in an easy and comprehensive way.

If you are in a hurry, you can also watch the video tutorial at the end of the article

Simple tutorial

Add an account with the quick option

To add an email account to Outlook, follow the steps below
source

  1. Open Outlook and select File > Add Account.
    If you have not launched Outlook before, a welcome screen appears.
  2. Enter your email address, then select โ€œSign inโ€.
    If your screen looks different, enter your name, email address, and password, then select Next.
  3. If prompted, enter your password and select OK.
  4. Select Finish.

Manual configuration for advanced options

If you need to enter specific values for incoming and outgoing server names, port numbers, or SSL settings, you can use Outlook's advanced configuration option. You can use these instructions to add a POP or IMAP account in Outlook.

source

  1. Open Outlook and select File > Add Account.
  2. On the next screen, enter your email address, select Advanced options, check the Set up my account manually box, and then select Sign in.
  3. Select your account type. When you use this option, most of the time you select IMAP.
  4. The Account Settings screen should be pre-populated with most of the account settings you need to configure. However, if you need to find your settings, see POP and IMAP account settings. Enter your incoming and outgoing server settings, then select Next.
  5. Enter your password, then select Login.

Advanced tutorial

1) Go to Outlook options

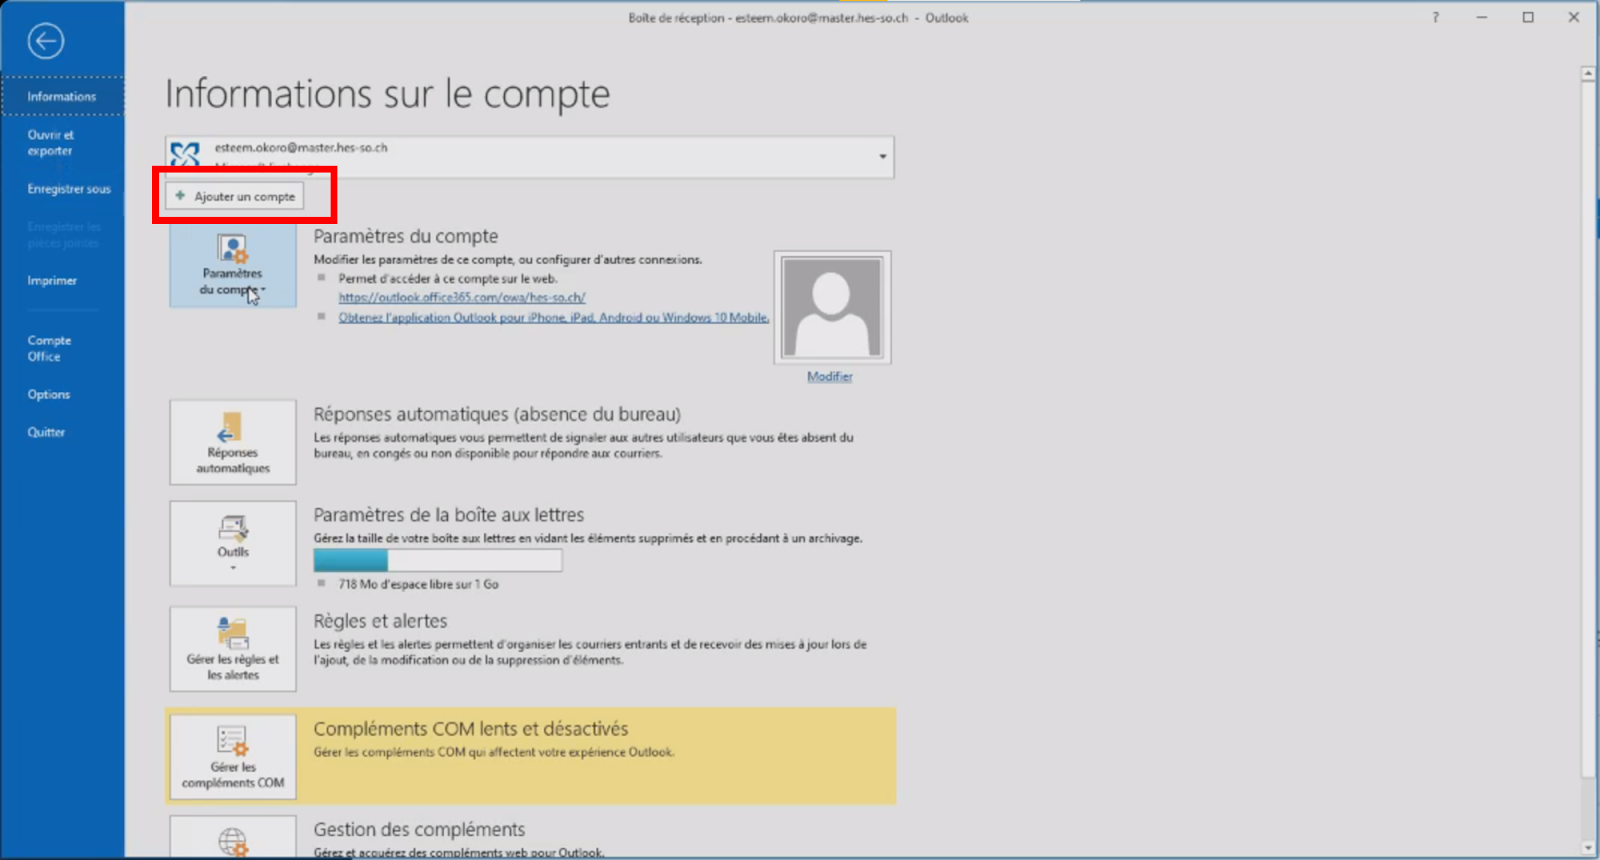
Click "File" in the top left, then click "Add Account."

2) Choose the type of account

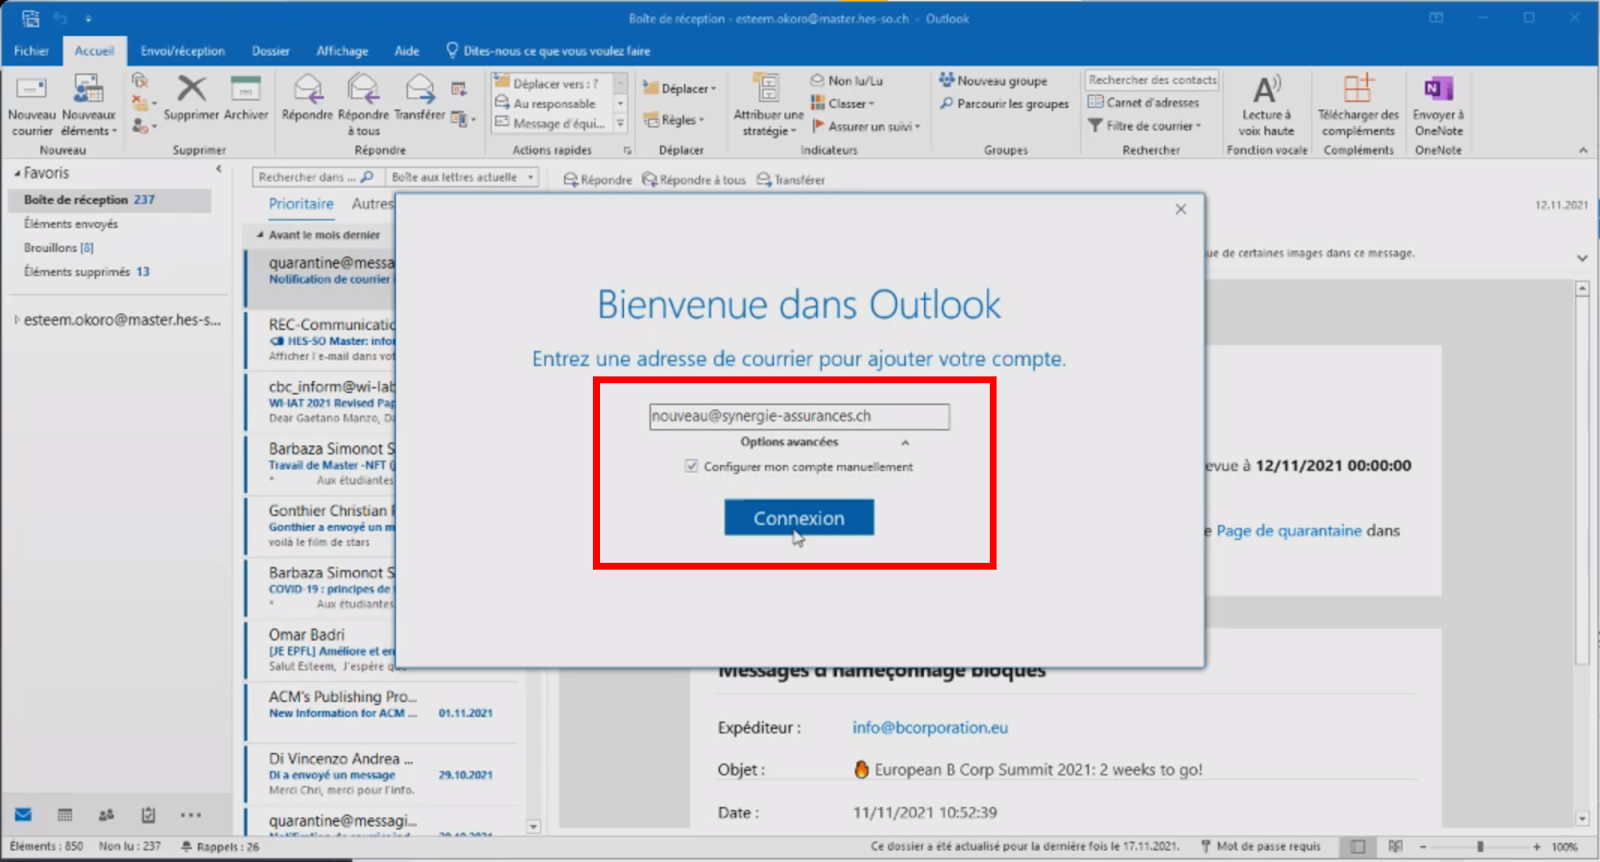
In the pop-up window, you can enter the email address of the account you want to add and click "Sign In". If you want to configure the account manually, click on "Advanced options", then click on "Sign in". If Outlook recognizes your email account, it will ask you to enter your password and complete the setup.ย 

If it's a simple webmail account (like Gmail), Outlook can usually do this automatically. If you're setting up an IMAP or Microsoft Exchange account, it's often quicker to choose to do it manually.

Most email accounts can be added automatically with a username and password, but others will require a manual approach.ย 

3) Manual Setup

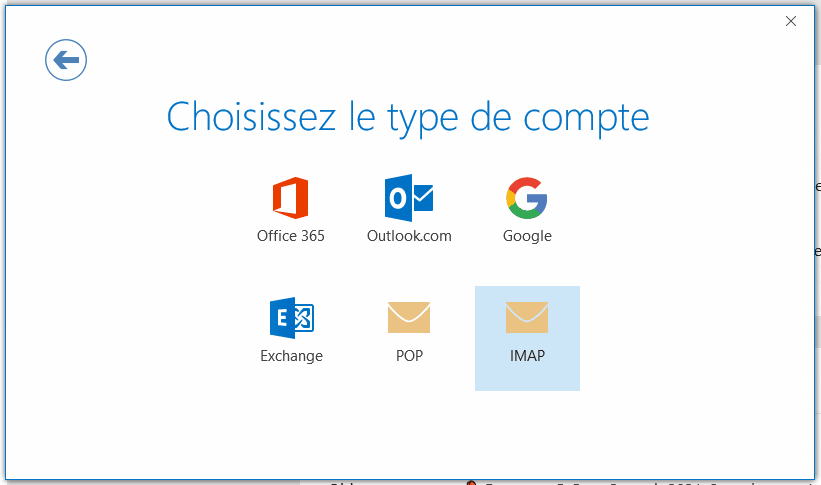
If you need to set up your account manually, choose the type of account you're setting up. The most common options include Microsoft Exchange, Microsoft 365, POP, and IMAP. You can find this information by using Google to determine what type of email account you have.

> In the case of Infomaniak, you must choose IMAP.

IMAP on Outlook

4) Advanced Setup

Follow the remaining instructions to set up the account. Depending on the type of email account you are adding, you may need to specify incoming and outgoing mail server names, port numbers, and encryption methods. You can get all these details by contacting your support or the IT person who manages your email.

Be sure to collect all the information you will need from your email provider or network administrator before adding the account to Outlook.

5) Configuration with your email Infomaniak

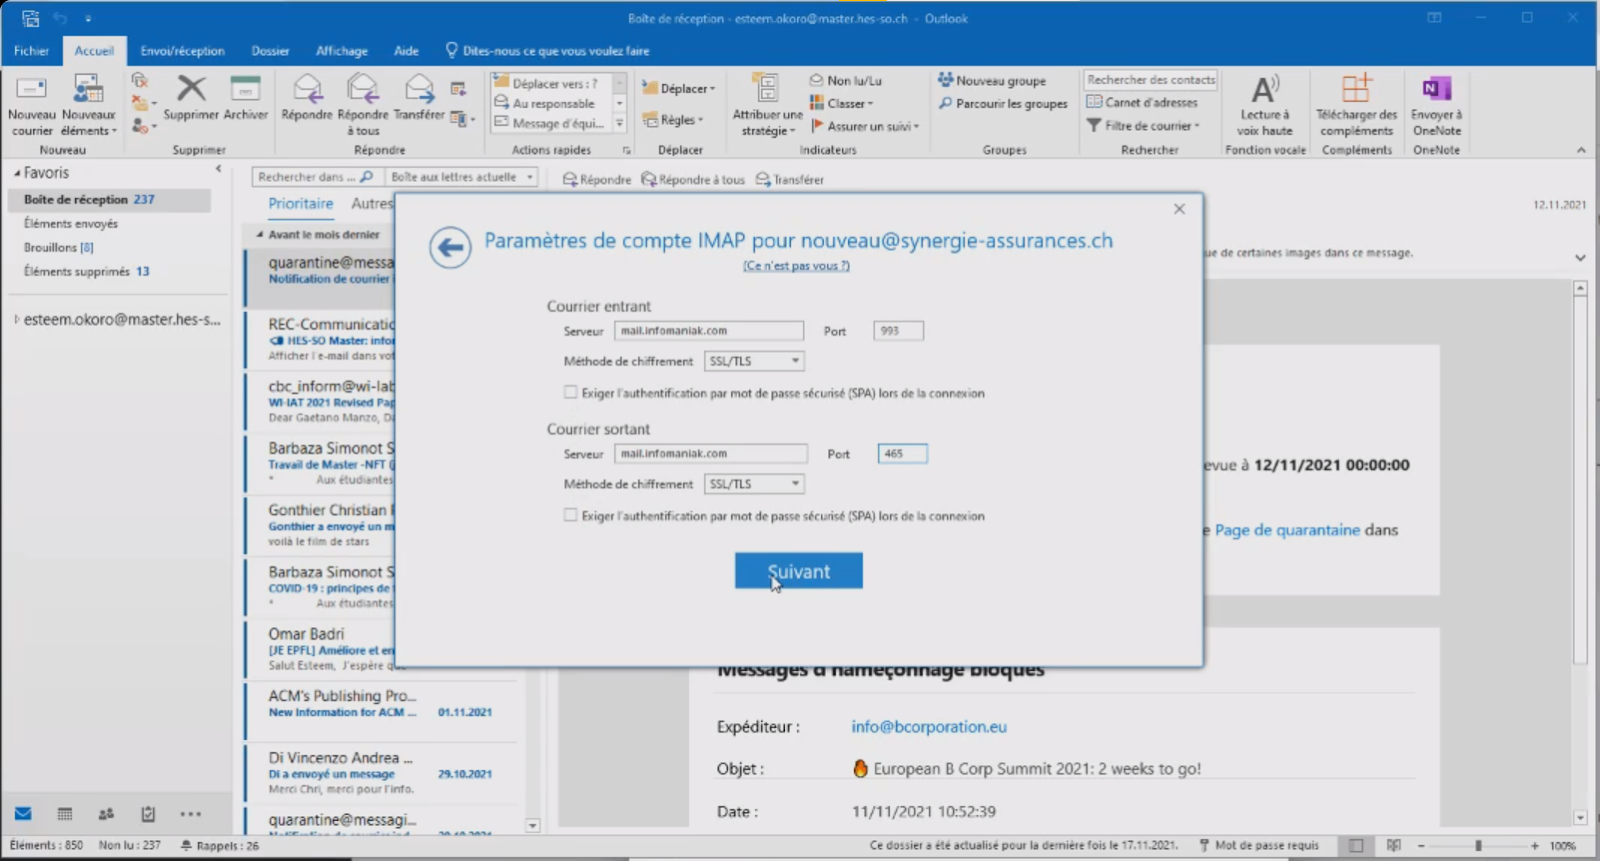
This information concerns the Infomaniak email hosting service. The configuration of the servers depends on the host you have chosen.

  1. Open appย Microsoft Outlook.
  2. Click onย Fileย then onย Add an account.
  3. Provide your email addressย example@domain.ch. Then click onย Login.
  4. Chooseย IMAP.
  5. Fill in the address of the incoming serverย mail.infomaniak.comย with as portย 993ย and as an encryption methodย SSL/TLS.
  6. Enter the outgoing server addressย mail.infomaniak.comย with as portย 465ย and as an encryption methodย SSL/TLS.
  7. Enter the email password and complete the procedure. Great, you've finished configuring this email address!

According to Infomaniak documentation, here is the data you need to enter:

Login information
Incoming IMAP server = mail.infomaniak.com
IMAP port = 993 with SSL
Outgoing SMTP server = mail.infomaniak.com
SMTP port = 465 with SSL/TLS
Username = full email address
Password = the one you assigned
(to be checked) Authentication = mandatory for sending
Infomaniak: IMAP and SMTP connection information

Once done, you must enter your password and you will have finally added your new account to Outlook!

Video tutorial

Other articles

Choosing your Web Agency in Lausanne in 2025
Choosing your Web Agency in Lausanne in 2025: The Complete Guide for SMEs
Low-Code / No-Code: Revolution or Pitfall?
Google ia consent
Google Ads 2025: A Guide to AI and Consent
Search Console domain validation via the DNS zone
Tutorial: Search Console domain validation via DNS zone
DNS MX GOOGLE WORKSPACE
Tutorial: Configuring Google DNS for Email after a Domain Migration
Creating a conversion action in Google Ads
How to create a conversion action in Google Ads without using GA4?

Customer satisfaction โ‡„

= Responsiveness + Quality + Quality Prices โ†ฏ

Our web agency is focused on quality and satisfaction for both
entrepreneurs, SMEs and large companies in French-speaking Switzerland

Chiara Cuffaro
chiaracuffarokinesiologie.ch
A huge thank you to Geekworkers for their excellent work on my website. Their responsiveness, professionalism and creativity made all the difference. A smooth collaboration and results beyond my expectations. I highly recommend!
Senghane Lmighty
whodaboss.app
Thank you to Geekworkers for their exceptional work! They understood my vision perfectly and created a landing page exactly as I wanted it. They were professional, creative and responsive throughout the project. I'm delighted with the result, which perfectly reflects the image of my application. I'd highly recommend their services to anyone looking for a quality digital agency!"
Michel Rey
zenityacademy.ch
A big thank you to Geekworkers for creating my website. Their professionalism, attentiveness and expertise made all the difference. A top team that I highly recommend! Their responsiveness and help in creating my content were a real advantage. An in-depth analysis of my needs was carried out from the outset and I was given permanent access to the progress of the project. Don't hesitate to work with them.
Ernesto Carreรฑo
ernestdetailing.ch
GeekWorkers created an effective, modern landing page that was perfectly suited to our objectives. Their team showed great professionalism, and the work was carried out quickly and meticulously. We're delighted with the end result and would highly recommend their services for any web project.
Newash SA
newash.ch
I would like to express my deep appreciation for Geekworkers. Their outstanding customer service, professionalism and commitment to customer satisfaction is truly impressive. My experience has been exceptional and I highly recommend this company. Thank you for your service.
Bobi
bobiapp.ch
Geekworkers gave me a clear, actionable vision for developing Bobi. Their recommendations on SEO, digital acquisition and platform optimisation were relevant and impactful. A professional and efficient team that I recommend without hesitation! ๐Ÿš€
Silvia Castillo
Very good service, follow-up and professionalism. I highly recommend them.
Turkey Lucidity
depotclesecurite.ch
Serious, efficient and friendly are the words that spontaneously appear after a month and a half of work on my future page.
4.9/5
300+ satisfied customers in Switzerland
more reviews on google